learn tf with pattern
Learning machine learning using tensor flow with intuition
intro
With prior knowledge of ANN architectures TensofFlow functions are learned intuitively by observing the pattern on Python syntaxes from previous code in a story 1. But, unfortunately it does not work well.
template
Previous code is used as template
# Step 1: Import Required Libraries
import numpy as np
import tensorflow as tf
from tensorflow.keras import layers

# Step 2: Prepare the Dataset
(x_train, y_train), (x_test, y_test)
  = tf.keras.datasets.mnist.load_data()

# Normalize the data
x_train = x_train / 255.0
x_test = x_test / 255.0

# Step 3: Create the Neural Network Model
model = tf.keras.Sequential([
    layers.Flatten(input_shape=(28, 28)),
    layers.Dense(128, activation="relu"),
    layers.Dense(128, activation="relu"),
    layers.Dense(10, activation="softmax")
])

# Step 4: Compile the Model
model.compile(
    optimizer="adam",
    loss=tf.keras.losses.
      SparseCategoricalCrossentropy(from_logits=True),
    metrics=["accuracy"]
)

# Step 6: Train the Model
model.fit(x_train, y_train, epochs=10)

# Step 7: Evaluate the Model

test_loss, test_acc = model.evaluate(x_test, y_test,
  verbose=2)
print(f"Test accuracy: {test_acc}")
models
As first model a perceptron with two input node and one output nodes, without hidden layer(s) is as follow.
The model should be something like
model = tf.keras.Sequential([
  layers.Dense(2, activation="relu"),
  layers.Dense(1, activation="softmax")
])
Then, as second model, it has nodes of 2-3-1 in input, hidden, and output layers.
It should be something like
model = tf.keras.Sequential([
  layers.Dense(2, activation="relu"),
  layers.Dense(3, activation="relu"),
  layers.Dense(1, activation="softmax")
])
And for the final model, or the third, it has 2-3-2-1 nodes configuration within four layers.
This model should have lines of codes similar to
model = tf.keras.Sequential([
  layers.Dense(2, activation="relu"),
  layers.Dense(3, activation="relu"),
  layers.Dense(2, activation="relu"),
  layers.Dense(1, activation="softmax")
])
The activation functions are not describes in the models. Types of them in above figures are only for illustration.
code – attempt 1
# Step 1: Import Required Libraries
import numpy as np
from sklearn.model_selection import train_test_split
import tensorflow as tf
from tensorflow.keras import layers

# Step 2: Create the Neural Network Model
model = tf.keras.Sequential([
    layers.Dense(2, activation="relu"),
    layers.Dense(1, activation="sigmoid")
])

# Step 3: Compile the Model
model.compile(
    optimizer="adam",
    loss=tf.keras.losses.SparseCategoricalCrossentropy(from_logits=True),
    metrics=["accuracy"]
)

# Step 4: Create Dataset
dataset = np.array([
    [0, 0, 1], [1, 0, 1], [2, 0, 1], [3, 0, 1], [4, 0, 1],
    [0, 0, 0], [1, 1, 1], [2, 1, 1], [3, 1, 1], [4, 1, 1],
    [0, 0, 0], [1, 2, 0], [2, 2, 1], [3, 2, 1], [4, 2, 1],
    [0, 0, 0], [1, 3, 0], [2, 3, 0], [3, 3, 1], [4, 3, 1],
    [0, 0, 0], [1, 4, 0], [2, 4, 0], [3, 4, 0], [4, 4, 1]
])

# Step 5: Get Input and Output, Scale Output from Dataset
x = dataset[:, :2]
y = 0.1 + 0.8 * dataset[:, 2]

# Step 6: Split Input and Output
x_train, x_test, y_train, y_test = train_test_split(
    x, y, test_size=0.30, random_state=1
)

# Step 7: Train the Model
model.fit(x_train, y_train, epochs=5)

# Step 8: Evaluate the Model
test_loss, test_acc = model.evaluate(x_test, y_test, verbose=3)
print()
print(f"Test accuracy: {test_acc}")
print(f"Test loss: {test_loss}")
It does not produce any error messages, but the results seem wrong.
learn first
Read https://keras.io/guides/sequential_model/ since I do not understand. So this post does not work, since my prior knowledge is not adequate to create the model.
draw Model
Then I learn to draw the model. But, it requires that two Python packages must be installed first
(tf) M:\py-jupyter-nb>pip install pydot
Collecting pydot
  Downloading pydot-2.0.0-py3-none-any.whl.metadata (9.6 kB)
Requirement already satisfied: pyparsing>=3 in v:\tf\lib\site-packages (from pydot) (3.1.2)
Downloading pydot-2.0.0-py3-none-any.whl (22 kB)
Installing collected packages: pydot
Successfully installed pydot-2.0.0

(tf) M:\py-jupyter-nb>
(tf) M:\py-jupyter-nb>pip install graphviz
Collecting graphviz
  Downloading graphviz-0.20.3-py3-none-any.whl.metadata (12 kB)
Downloading graphviz-0.20.3-py3-none-any.whl (47 kB)
   ━━━━━━━━━━━━━━━━━━━━━━━━━━━━━━━━━ 47.1/47.1 kB 1.2 MB/s eta 0:00:00
Installing collected packages: graphviz
Successfully installed graphviz-0.20.3

(tf) M:\py-jupyter-nb>
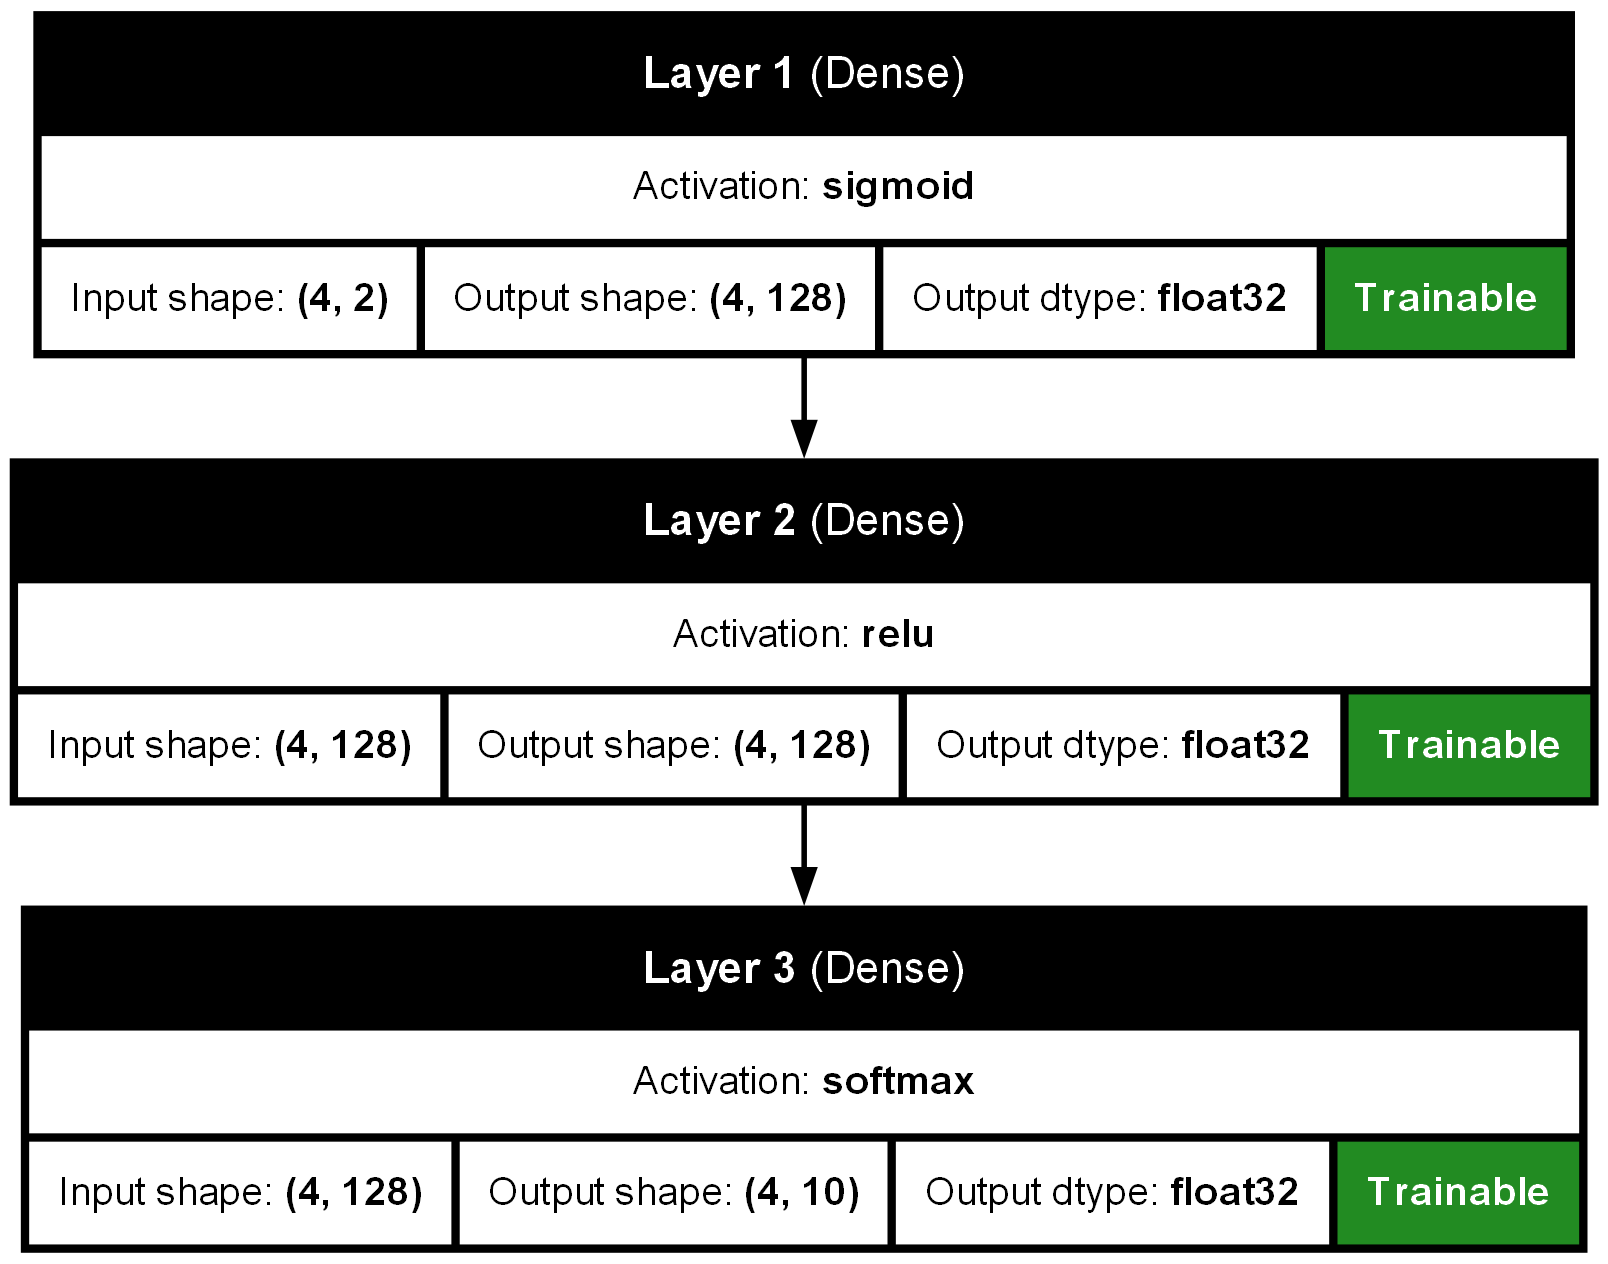
then also Graphviz software. How to install it is on Medium Install Graphviz on Windows 11. The code
import numpy as np
import tensorflow as tf
from tensorflow.keras import layers
import keras
from keras import ops

# create input, two features, four rows
l = [ [1, 1], [1, 2], [2, 1], [2, 2] ]
x = ops.array(l)

model = tf.keras.Sequential([
    layers.Dense(128, activation="sigmoid", name="Layer 1"),
    layers.Dense(128, activation="relu", name="Layer 2"),
    layers.Dense(10, activation="softmax", name="Layer 3")
])

y = model(x)
print(x)

dot_img_file = 'model_1.png'
keras.utils.plot_model(
    model,
    to_file=dot_img_file,
    show_shapes=True,
    show_dtype=True,
    show_layer_names=True,
    rankdir="TB",
    show_layer_activations=True,
    expand_nested=True,
    show_trainable=True
)
will produce model_1.png as the result.
notes
Sparisoma Viridi, “A Python Virtual Environment for TensofFlow”, Mr Plant B Publication – Medium, 9 May 2024, url https://medium.com/p/3056789ab7a2 [20240510]. ↩︎